# Fitting a New Keel to MERIEL
(see issue 2 of SEACATS, which also has other articles about Jaguar 22s)
We Bought a J22 Without a Keel! My brother James and myself were looking for a sailing boat since all our experience was with powered boats. Meriel was a Jaguar 22 of uncertain vintage that had sunk at its mooring at Emsworth, Chichester Harbour. The Harbour Master had pumped it out and moved it to Itchenor where we found it with a broken mast. rigging torn from the deck and generally looking very sorry for itself. It had been left on the hard ready to be sold off by Tender. We discovered from the Harbour Masters office that along with the visible damage, the keel was also missing.
At each High Tide it filled with muddy harbour water which could later be heard draining from somewhere in the hull. Our worst fears were that in losing the keel it had torn a hole in the bottom and therefore caused it to sink but a bit of probing around revealed a stopcock draining as the tide receded. We hoped this was the reason for the sinking and put in our ultimately successful bid.
Meriel was ours. Now all we had to do was move her to a boatyard at Dellquay where the ‘restoration’ could begin in earnest. But first the leak. At low tide we baled all the dirty water out (and resident crabs), removed all the floating debris and found the suspect stopcock. As expected it was corroded and broken but a wooden bung was quickly knocked in and all that was left to do was wait for the tide to return. To our great relief she floated and a quick tow had her at the boatyard and lifted out.
First job was to sort out the keel. We thought that perhaps the keel had broken off where she had been moored but a search of the area by the very helpful Harbour staff at Emsworth found nothing. We guessed it must have fallen off while being towed to Itchenor and was therefore definitely lost.
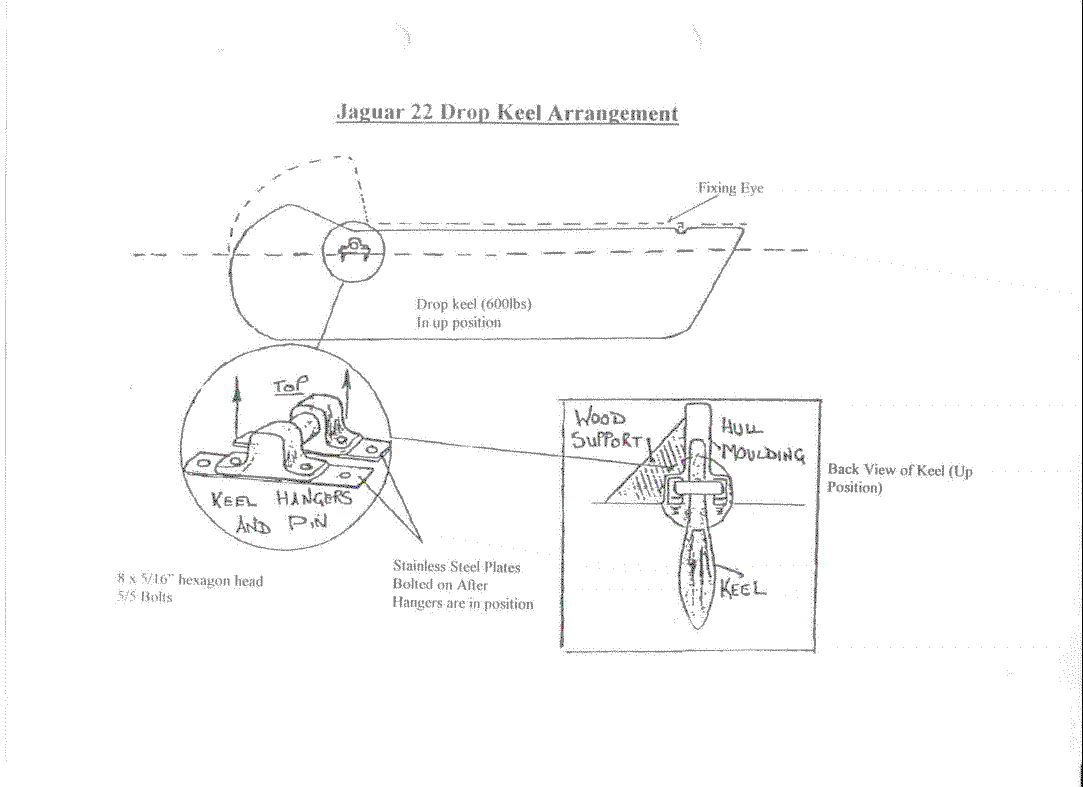
Later inspection of the hull revealed that the keel was bolted on with four bolts to nuts that had been glassed into the hull moulding. This seemed a rather suspect method so we decided the new keel would be bolted right through the hull. The risk of leaking bolts was better than the thought of it falling off again.

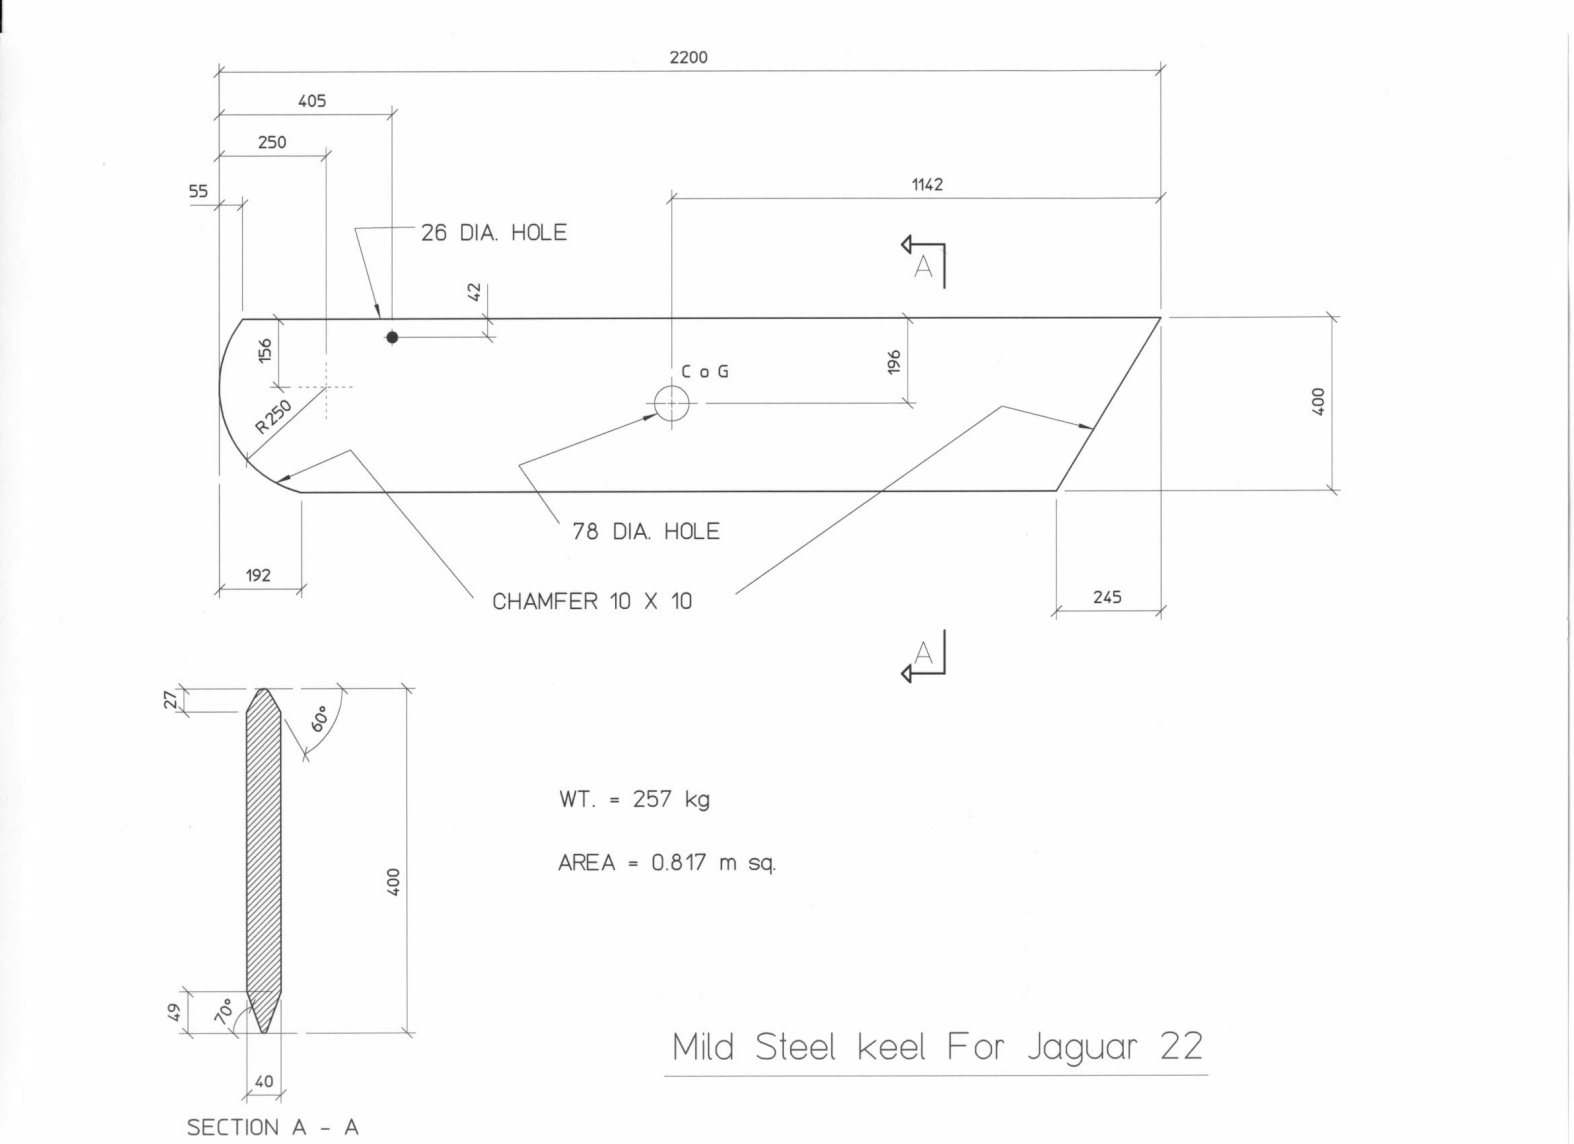
A few quick phone calls revealed that the cost of having a new keel cast was way beyond our budget so we decided to make our own. I work at a structural steel company so we thought this shouldn’t be too much trouble once we had the shape of the keel. By scaling the original drawings that we obtained from Canvey Yacht Builders and measuring every J22 that we could find out of the water (we never managed to see a complete keel) we finally had a drawing of our new keel. This was slightly longer than the original because cast iron is heavier than rolled steel. We figured a bit more depth wouldn’t hurt anyway if it fitted the hull slot.
From CYB we purchased new bronze keel hangers and pivot pin. With these we made a plywood template to check that our drawing was correct before having the steel keel profile cut. We made the keel 40mm thick which only just fitted the moulded hull slot. A bit judicious grinding of some protruding fibreglass soon had the template fitted. We were now ready to order our new steel keel.
The original cast keel had a slight aerofoil shape to it that we could not replicate with flat steel plate so we faired the front and trailing edges by gas cutting and a lot of grinding. When this was complete we then had it hot dipped galvanised for protection. Now all we had to do was fit it!
The boatyard at Dellquay had been chosen because the boats were stored on a wooden platform at the foreshore. This enabled us to lift the boat onto wood props and remove some of the planks below giving us crouching room under the hull. We built two timber A-frames on each side of the hull and fitted lifting chain blocks to the A-frames.
A scaffold pole was then passed through a hole in the keel that we had cut at the centre of gravity. This enabled us to lift the keel up and then pivot it around the scaffold pole until we were able to place the bronze keel hangers and pivot pin into the correct location under the hull. Four holes were quickly drilled through the hull and into some extra strengthening fibreglass we had built up inside. I’ll leave out the details of moving 600lb of steel through the black sticky Dellquay mud! The bolts were coated with sealant and tightened up. Next was to fit an eyebolt for the lifting wire. This was a simple case of drilling and tapping the edge of the keel for the new eye. We did not fancy using stainless steel wire, for lifting the keel, as had been fitted before (it had clearly snapped) so we fitted Dyneema rope which is extremely strong and hard wearing. We changed this after 3 years and it was still going strong with no sign of wear.
We fitted a sacrificial anode to each side of the keel as there was rather a mixture of metals present, slapped some coats of primer and antifoul on and our new keel was complete.
We have sailed quite a few miles with no sign of problems of leaks or performance. We also have the added bonus of being able to easily check the securing bolts and know it hasn’t fallen off again!
